Mountain biking is a great way to get outdoors and enjoy the fresh air. But, like any sport, it requires some maintenance to keep your equipment in top condition. In this article, we’ll show you how to tighten the rear hub on a mountain bike. This is a simple process that anyone can do, and it will help keep your bike running smoothly.
How To Know That You Have A Problem With Your Rear Hub
If you notice that your rear wheel is not spinning as freely as it should, or if you hear a grinding noise coming from the rear of your bike, then you may have a problem with your rear hub. In this section, we will show you how to know for sure that you have a problem with your rear hub, and how to fix it.
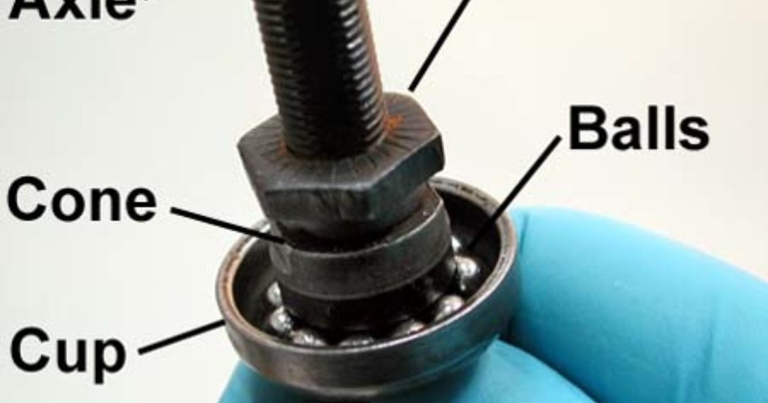
Hub Repair for Cone and Cup Style Mountain Bike Hubs
Mountain biking can be a great way to get outside and explore nature, but it’s important to keep your bike in good working condition. This section will show you how to repair a cone and cup style mountain bike hub. That includes making sure the rear hub is tight.
What are the Tools I require?
To tighten the rear hub on a mountain bike, you will need the following tools:
-A cone wrench
-A hub spanner
-A spoke wrench
-A cassette lockring tool
-A chain whip
First, you will need to remove the rear wheel from the bike. Once the axle nuts are loosened, you can remove the wheel from the frame. To do this, you will need to loosen the axle nuts with a cone wrench.
Then, use the chain whip to hold the cassette while you unscrew the lockring. To do this, you will need a cassette lockring tool and a chain whip. First, use the cassette lockring tool to loosen the lockring. Next, you will need to remove the cassette from the hub. Once the lockring is removed, you can remove the cassette from the hub.
Once the cones are loosened, you can remove them from the hub. Now, you will need to remove the hub cones. Then, use the hub spanner to loosen the cones. First, loosen the locknut on the hub. To do this, you will need a hub spanner.
First, use the hub spanner to tighten the cones. To do this, you will need a hub spanner and a spoke wrench. Once the spokes are tight, you can replace the cassette and the rear wheel. Finally, you will need to tighten the hub cones. Then, use the spoke wrench to tighten the spokes.
Step 1: Removing your Lock Nuts (Also known as Lock Bolts!)
To do this, you will need a wrench that fits the lock nut. Once the lock nut is removed, you will be able to access the cones and cups. If your mountain bike has cone and cup style hubs, then you will need to remove the lock nuts (also known as lock bolts) in order to access the cones and cups. Once you have the wrench, simply turn the lock nut counter-clockwise until it is loose enough to remove by hand.
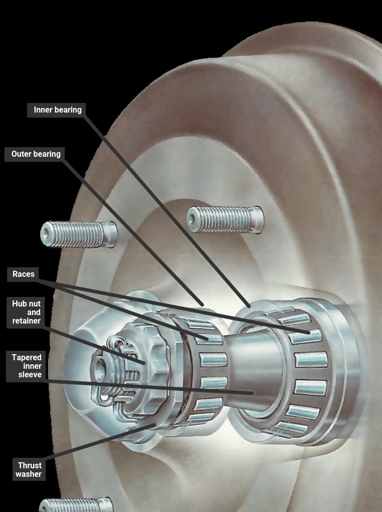
Step 2: Remove and Clean the Bearings
Next, remove the locknut and washer from the other side of the hub. To remove the bearings from the hub, first remove the cones and washers from the axle. Once the bearings are removed, clean them with solvent and repack them with grease. The bearings will be pressed into the hub, so you will need to use a bearing press or a hammer and punch to remove them. With the locknut and washer removed, the axle can be pulled out of the hub.
Step 3: Reapply Lubricant on your Hub
If your hub has cone and cup style bearings, you will need to reapply lubricant to the bearings after you have adjusted them. You can do this by removing the hub’s dust cap and adding a few drops of lubricant to the top of the cones. Finally, replace the dust cap and you’re done! Then, rotate the hub a few times to work the lubricant into the bearings.
Step 4: Refit the Axle into its Position
If your mountain bike has a cone and cup style rear hub, you will need to remove the axle in order to access the cones. This is a relatively simple process, but does require a few special tools.
This is a special wrench that is designed to fit over the cones. This is a tool that is used to remove the bottom bracket from the frame. You will also need a bottom bracket tool. First, you will need a cone wrench.
To remove it, simply unscrew it from the axle. This is the skewer that holds the wheel in place. Once you have these tools, you can begin the process of removing the axle. First, you will need to remove the quick release skewer.
Next, you will need to remove the axle nuts. These are the nuts that hold the axle in place. Simply loosen the nuts until they are loose enough to be removed by hand. To remove them, you will need to use the cone wrench.
Once the axle nuts are removed, you can remove the axle. To do this, simply pull it out of the frame.
These are the parts that need to be adjusted in order to tighten the rear hub. To adjust the cones, you will need to use the cone wrench. Once the axle is removed, you can access the cones.
Simply tighten or loosen the cones until they are in the correct position. Once the cones are adjusted, you can replace the axle and axle nuts. To do this, simply reverse the process that you used to remove them.
To do this, simply screw it back into place. Once the axle and axle nuts are in place, you can replace the quick release skewer.
If it moves, the rear hub is still too loose and you will need to repeat the process. Once the quick release skewer is in place, you can test the rear hub to see if it is tight. To do this, simply try to move the wheel from side to side.
Step 5: Refit the Cassette
If your mountain bike has a cone and cup style rear hub, then you will need to refit the cassette after you have finished repairing the hub. To do this, you will need to first remove the wheel from the bike. Once the locknut is removed, you will be able to remove the cassette from the hub. To do this, you will need to first remove the locknut from the hub using a locknut wrench. Once the wheel is removed, you will need to remove the cassette from the hub.
To clean the cassette, you will need to use a cassette cleaning brush. Once the cassette is removed from the hub, you will need to clean the cassette and the hub. To do this, you will need to first remove the dust cap from the hub. Once the dust cap is removed, you will be able to clean the inside of the hub.
To install the cassette onto the hub, you will need to first align the splines on the cassette with the splines on the hub. Once the hub and the cassette are clean, you will need to reinstall the cassette onto the hub. To do this, you will need to first install the dust cap onto the hub. Once the splines are aligned, you will be able to install the cassette onto the hub. Once the dust cap is installed, you will be able to install the cassette onto the hub.
Once the cassette is installed onto the hub, you will need to install the locknut onto the hub. Once the locknut is threaded onto the hub, you will need to use a locknut wrench to tighten the locknut onto the hub. Once the locknut is tightened onto the hub, you will be able to install the wheel onto the bike. To do this, you will need to first thread the locknut onto the hub.
For Cartridge Style Mountain Bike Hubs
If your mountain bike has a cartridge style rear hub, then you will need to follow a specific set of steps in order to tighten it properly. These steps are outlined below.
What are the tools I Will Need?
Next, use the screwdriver to remove the axle nut. The tools you will need to tighten the rear hub on a mountain bike are: a wrench, a screwdriver, and a bike stand. First, use the wrench to loosen the bolts that hold the wheel in place. Finally, use the bike stand to hold the wheel in place while you tighten the bolts.
Step 1: Remove your Dust Caps
Be careful not to lose the small spring that is underneath the ring. Assuming you have a cartridge style mountain bike hub, the first step is to remove your dust caps. You will need a small Phillips head screwdriver for this. Once the dust caps are removed, you will see a small retaining ring. Use the screwdriver to remove this ring.
Step 2: Remove the Old Bearings
Lastly, you will need a hammer and a punch to remove the old bearings from the hub. You can find a bearing press at most bike shops, or online. Second, you will need a few different size allen wrenches, to remove the axle bolts. To remove the old bearings from your cartridge style mountain bike hub, you will need a few tools. First, you will need a bearing press.
Once the old bearings are removed, you can press the new bearings into the hub. Next, use the bearing press to remove the old bearings from the hub. To begin, remove the axle bolts with an allen wrench. You may need to use the hammer and punch to remove the old bearings from the hub.
You can find the appropriate torque for your axle bolts in the owner’s manual for your mountain bike. Re-install the axle bolts, and tighten to the appropriate torque.
Step 3: Remove your Second Bearing
If you have a cartridge style mountain bike hub, then you will need to remove your second bearing before you can proceed to step 4. To do this, you will need a bearing press.
Use the bearing press to press the second bearing out of the hub. First, remove the axle from the hub. Next, remove the retaining ring that holds the second bearing in place.
Once the second bearing is removed, you can proceed to step 4.
Step 4: Put Your New Bearings into Place
Be sure to press the bearings out from the inside of the hub so that the new bearings can be pressed in from the outside. Next, use a bearing press or a hammer and punch to press the old bearings out of the hub. To replace the bearings in a cartridge-style mountain bike hub, first remove the axle end caps with a hex wrench.
Once the old bearings are removed, clean the hub shell with a degreaser and a rag. Then, press the new bearings into place using a bearing press or a hammer and punch. Be sure to press the bearings in from the outside of the hub so that they will be seated properly.

Finally, replace the axle end caps and tighten them securely with a hex wrench.
Step 5: Rejoice in your New Hub
You have an easier time ahead of you when it comes to tightening the rear hub. These hubs have bearings that are housed in a cartridge, which can be easily removed and replaced. If you have a cartridge style mountain bike hub, rejoice! Make sure to screw the end cap back on tightly before you go for a ride. All you need to do is unscrew the end cap, remove the old cartridge, and insert the new one.
How do Mountain Bike Rear Hubs Break?
Mountain biking is an outdoor activity that is enjoyed by many people around the world. In this section, we will discuss how to properly tighten the rear hub on a mountain bike. It is a great way to get exercise while enjoying the beauty of nature. However, mountain biking can be a dangerous sport if the proper safety precautions are not taken. If the rear hub is not properly tightened, it can break and cause the rider to lose control of the bike. One of the most important safety precautions for mountain biking is to ensure that the rear hub is properly tightened. This can lead to serious injury or even death.
Troubleshooting for Problems
If you’re having trouble tightening the rear hub on your mountain bike, don’t worry – you’re not alone. In this section, we’ll walk you through some common issues and how to fix them.
The Bottom Line
This is because if the rear hub is not tight, the bike will not be able to ride properly and may even become dangerous. The bottom line of this article is that it is important to know how to tighten the rear hub on a mountain bike. There are a few steps that need to be followed in order to properly tighten the rear hub, and these will be outlined in the article.
Frequently Asked Questions
1. How do I know if my rear hub needs to be tightened?
If your mountain bike starts making a creaking noise when you ride it, or if the rear wheel starts to feel loose, then it’s likely that your rear hub needs to be tightened.
2. What tools do I need to tighten a rear hub?
All you need is a wrench that fits the axle nuts on your rear hub.
3. How do I tighten the rear hub?
First, use the wrench to loosen the axle nuts. Then, spin the rear wheel and tighten the axle nuts until they’re snug. Finally, spin the rear wheel again and check that it’s still spinning smoothly.
4. What if my rear hub is still making noise after I’ve tightened it?
If your rear hub is still making noise, it’s possible that the bearings need to be replaced.
5. Can I tighten the rear hub myself, or do I need to take it to a bike shop?
If you’re comfortable working on your own bike, then you can tighten the rear hub yourself. However, if you’re not confident in your abilities, it’s best to take it to a bike shop.
Final thoughts
To tighten the rear hub on a mountain bike, follow these steps: 1) Use the Park Tool HCW-5 to remove the locknut. 2) Loosen the cones with a 15mm wrench. 3) Adjust the cones until there is no play in the hub. 4) Tighten the locknut. 5) Use the Park Tool HCW-5 to check that the locknut is tight.
By following these steps, you can easily tighten the rear hub on a mountain bike. This will ensure that the bike rides smoothly and safely.